close

Fox Renderfarm Blog

Any Free Render Farm for Cinema 4d, Maya, 3ds Max?

Any Free Render Farm for Cinema 4d, Maya, 3ds Max?

2023-10-18

Maya Cloud Rendering

I think you always search for a free render farm for Cinema 4d, Maya, 3ds Max, but you will find that a completely free render farm does not exist, to be honest, most of the platforms needs to charge due to the reasons below.1. Hardware costThe bigger the render farm network, the quicker the rendering speed. According to the top render farm companies such as FoxRender****farm, they have over 30,000 physical servers, you can calculate the hardware cost.2. Maintaining CostNeed to rent a room in the data centre to place all of the rendering nodes. It would also be a large expense every year.3. Human Resource CostNeed a lot of specialists in customer service, technical support, research & development, marketing.However, you can find out which render farm is the cheaper one, at the same time, you can get a free trial from the render farm. I would like to introduce Fox Render****farm, the best cloud rendering service in the world. It has high compatibility, supports most mainstream software and plugins, including 3ds Max, Maya, Arnold, V-Ray, Redshift etc.Fox Render****farm is a leading cloud rendering service provider in the industry. Since the operation in 2011, Fox Render****farm has earned a good reputation for its quality performance, great customer service, and flexible pricing scheme. With over 20 years of experience, the pioneering core team served more than 400,000 users and top leading visual effects companies and animation studios from over 100 countries or regions, clients including multiple awards and Oscar winners.Web-based Cloud Rendering PlatformThe picture is the web-based interface of the platform,1. The upper right corner is message, guide, setting and account info;2. The left is rendering steps;3. The middle is the dashboard of render info.Desktop ClientThe picture is the desktop client interfaceReady for Windows and Linux users;Drag-and-drop batch submission;Submit your jobs inside your 3D software.Ready For WindowsSupported Software:Maya 2015 64bit+ / 3ds Max 2014 64bit+Fox **Renderfarm**'s Data Center is powered by 100% green, renewable energy:Hydro Wind turbinesPUE 1.2The users of Fox **Renderfarm are making a big contribution to reducing greenhouse gas emissions and protecting our environment.If you want to learn more about Fox **Renderfarm, we offer a US$25 free trial to new users, welcome to take an experience. Enjoy your cloud rendering journey with Fox **Render*farm!


How to use Maya Render Farm or Render Maya with Cloud Rendering?

How to use Maya Render Farm or Render Maya with Cloud Rendering?

2023-05-06

Maya Render Farm

As a professional 3D software, Maya's powerful features make it a popular software for large production companies. Many of the beautiful shots we see are actually made with Maya, and when it comes to Maya creation, rendering is also inevitable. Rendering is the last part of making a 3D model come to life. It is actually a process of shading and texturing the objects and illuminating the scene. Rendering is definitely a challenge, especially for large projects where rendering takes a lot of time and machines, so is there anything you can do to speed up Maya rendering?Some companies and studios, in order to deliver their projects before the deadline, will choose powerful render farms to help rendering, such as Fox Render****farm. So now, as a Maya render farm, Fox Render****farm will show you how to do Maya rendering on the excellent cloud rendering platform.a. Desktop Client Submit Tutorial for Maya Cloud Rendering1. First you need to sign up to get a account of Fox Render****farm rendering platform (Note: new users can get a free $25 trial coupon for signing up).Next, start the desktop client, select the platform to log in, and enter the main interface.2. Drag the maya file to the job area in the client to trigger the submission and start the scene analysis.3. Select your software version and hardware configuration corresponding to the file, and click "Next" to enter the analysis page.4. When the analysis is done, click “Next” (Note: corresponding prompt will appear in case of any error in the analysis results or warning thereof), then click “Ignore and continue” to set render parameters.5. Click “Submit” to start the uploading. The rendering is automatically started upon the completion of submission.b. Web Submit Tutorial for Maya Cloud Rendering1. Some preparations for Maya rendering in web.1.1 Register to get an account.1.2 Compare the local and could asset directories.2. Maya web submission process (submit > analyze > render > download).2.1 Click “Submit” button on the left, select the software for submission > set a project path (Note: select a project path to map the local Maya project path) > select the document for rendering, after that, click “Continue”.2.2 Select software version and hardware configuration corresponding to the file (Note: selection of the rendering system), then click "Go Analysis", and wait patiently for the analysis to complete.2.3 Click the job with “Analysis done”, set render parameters and then submit it for rendering (Note: the rendering actually just starts now).2.4 On the rendering page, click the job > export the file > download.That's all about how to accelerate Maya rendering on a cloud rendering platform. After reading this, don't you think it is very simple and easy to use? By using a Maya render farm, you can render high-quality images in as little time as possible in order to meet the final production deadline, making it the perfect choice for most CG artists. Well, if you also have a Maya project to render, the Maya render farm can definitely be of great help to you!


How to Set Up a Maya Render Farm

How to Set Up a Maya Render Farm

2023-05-06

Maya Render Farm

Maya is an excellent 3D production software owned by Autodesk. It is very famous in the animation design industry and belongs to the top design and production software. Especially in animation production, game characters, film special effects. For example, Blue Sky's animated movie Spies in Disguise in 2019 and Netflix's science fiction series Lost in Space. The issue of rendering is inevitably involved in animated film production. I believe that many people are worried about the rendering time is too long and the delivery time is too tight, but using the render farm is a good choice, so how to set up a Maya render farm?Spies in DisguiseLost in SpaceHow to build a Maya render farm? First of all, there are many issues to consider when setting up a render farm, such as the number of machines, the configuration of the machines, the network, labor, software, purchase of Maya's license, time cost, security, and your budget. You can refer to the following article: Is Building Your Own Render Farm The Best Option?If the project budget is tight, and you don't want to spend too much time on setting up and managing the render farm, you can consider using a commercial Maya render farm. After all, it can be used anytime, anywhere, and there is no project or the project has not reached the rendering progress when you don’t need to vacate your resources or ask someone to maintain it. Especially in the process of using your local render farm, if you encounter unexpected problems, you can also get the assistance of professional technicians. You don't have to spend time researching the problem yourself until you find a solution. During this period, if you are in a commercial Maya render farm, Some projects are estimated that you have finished rendering.The Top Benefits of Online Render FarmsOf course, choosing a commercial render farm also requires choosing a large and well-known professional online render farm, which guarantees safety. In addition to security, the number of machines and the quality of service can be provided very well. For example, the TPN-Accredited cloud render farm, Fox Render****farm, in addition to providing massive rendering nodes, 24/7 services, there are professional TD personnel to solve technical problems for you at any time. At the same time, Fox Render****farm is the rare render farm in the CG industry that supports both CPU and GPU rendering. Various mainstream software, renderers, and plug-ins are supported, as well as personalized customization services. Fox Render****farm provides multiple submission methods for users to choose from. In addition to web page upload, rendering, monitor, and download, offline software applications can also be used for asset uploading, rendering, monitoring, and downloading. It's very easy to use and it only takes a few steps.If you are still hesitating to build local Maya render farm or use a commercial render farm, why not directly get a free trial of $25 on Fox Render****farm, which can be used as a real experience reference.


The Best Cloud Rendering for Maya of 2024

The Best Cloud Rendering for Maya of 2024

2023-01-13

Maya Cloud Rendering

Sitting at your desk waiting to render 3D models and animations in Maya can often be frustrating. If you decide to do it locally, it can drain your CPU and GPU resources and it can take hours or days to fully render your work. Utilizing the productivity of a cloud rendering service provides an excellent alternative, offering speed and efficiency at a low cost, while rendering images in a fraction of the time required for a single workstation. If you want to find a good cloud rendering for Maya, read this article.First of all, do you know what cloud rendering is?What is Cloud Rendering?Cloud rendering is similar to cloud computing in general in that it is a rendering field based rendering approach. More specifically, it is a process where users upload assets to a cloud server for computation/rendering and the cloud server then sends the results back to the user. It includes offline rendering (render farms), real-time rendering and other calculations performed by cloud servers. The same goes for cloud rendering for Maya, which renders Maya files very well.Best Cloud Rendering for Maya- Fox Render****farmWhat is Fox Render****farm?Fox Render****farm is the industry's leading provider of cloud rendering services. In operation since 2011, Fox Render****farm has earned a reputation for quality performance, good customer service and flexible pricing plans. In order to build a more secure cloud rendering farm and better protect the privacy of our dear customers, Fox Render****farm has successfully completed the MPAA's content security best practices and is officially a TPN Trusted Partner.How to Render in Fox Render****farm?If you have made an interior design and want to render it at 3600x2500. A normal computer will take at least 3 to 6 hours, but with a cloud rendering service, the rendering time can be less than 1 hour by simply uploading the file to the desktop. Cloud rendering is several times faster than a house rendering farm. And it doesn't take up the producer's machine during the rendering process. And for the producer, you don't always need to be in front of your computer, you can view the rendering results anytime, anywhere. Let's see how to render with Maya render farm!Let's take the Maya web submission process as an example, only 4 steps in Maya render farm: submit > analyze > render > download.First you need to sign up to Fox Render****farm, then you will be taken to the cloud rendering page.Step 1. Click the "Submit" button on the left, select the software for submission> set a project path (Note: select a project path to map the local Maya project path)> select the document for rendering, after that, click "Next".Step 2. Add software configuration after submitting the job (Note: selection of the rendering system), click "Go Analysis" and wait patiently for the analysis to be completed.Step 3. Click the job with "Analysis Done", set render parameters and then submit it for rendering (Note: the rendering actually starts only at this job)Step 4. On the rendering page, click the job > export the file > download.Here are some projects that also use a cloud rendering services:ConclusionA good cloud rendering for Maya can make your files render faster and better. Not to mention that most online cloud rendering services offer free rendering vouchers. Fox Render****farm, for example, offers a free $25 trial.

A Melhor Cloud Rendering para Maya de 2024

A Melhor Cloud Rendering para Maya de 2024

2023-01-13

Maya Cloud Rendering

Sentar-se à sua mesa esperando para renderizar modelos e animações 3D em Maya pode muitas vezes ser frustrante. Se você decidir fazê-lo localmente, isso pode drenar seus recursos de CPU e GPU e pode levar horas ou dias para renderizar totalmente seu trabalho. A utilização da produtividade de um serviço de cloud rendering oferece uma excelente alternativa, oferecendo velocidade e eficiência a um baixo custo, enquanto renderiza imagens em uma fração do tempo necessário para uma única estação de trabalho. Se você quiser encontrar uma boa cloud rendering para Maya, leia este artigo.Antes de mais nada, você sabe o que é cloud rendering?O que é Cloud Rendering?Cloud rendering é semelhante à computação em nuvem em geral, na medida em que é uma abordagem de renderização baseada em campo. Mais especificamente, é um processo onde os usuários carregam ativos em um servidor de nuvem para computação/renderização e o servidor de nuvem então envia os resultados de volta para o usuário. Ele inclui renderização offline (render farms), renderização em tempo real e outros cálculos realizados por servidores de nuvem. O mesmo vale para a cloud rendering para o Maya, que torna os arquivos Maya muito bem.Melhor Cloud Rendering Maya - Fox Render****farmO que é Fox Render****farm?Fox Render****farm é a principal fornecedora do setor de serviços de prestação de serviços em nuvem. Em operação desde 2011, a Fox Render****farm conquistou uma reputação de desempenho de qualidade, bom atendimento ao cliente e planos de preços flexíveis. A fim de construir uma fazenda de cloud rendering mais segura e proteger melhor a privacidade de nossos queridos clientes, a Fox Render****farm completou com sucesso as melhores práticas de segurança de conteúdo da MPAA e é oficialmente um Parceiro de Confiança TPN.Como Render na Fox Render****farm?Se você fez um projeto de interiores e quer renderizá-lo a 3600 x 2500. Um computador normal levará pelo menos 3 a 6 horas, mas com um serviço de cloud rendering, o tempo de renderização pode ser inferior a 1 hora simplesmente carregando o arquivo para a área de trabalho. Cloud rendering é várias vezes mais rápido do que a de uma render farm doméstica. E não ocupa a máquina do produtor durante o processo de renderização. E para o produtor, você não precisa estar sempre em frente ao seu computador, você pode ver os resultados da renderização a qualquer hora, em qualquer lugar. Vamos ver como renderizar com Maya render farm!Tomemos como exemplo o processo de submissão na web do Maya, apenas 4 passos no Maya render farm: submit > analyze > render > download.Primeiro você precisa se inscrever na Fox Render****farm, depois você será levado para a página de cloud rendering.Passo 1. Clique no botão "Submit" à esquerda, selecione o software para submissão> definir um caminho de projeto (Nota: selecione um caminho de projeto para mapear o caminho local do projeto Maya)> selecione o documento para renderização, depois disso, clique em "Next".Passo 2. Adicionar a configuração do software após o envio do trabalho (Nota: seleção do sistema de renderização), clicar em "Go Analysis" e aguardar pacientemente que a análise seja concluída.Passo 3. Clique no trabalho com "Analysis Done", defina os parâmetros de renderização e depois submeta-o para renderização (Nota: a renderização realmente começa apenas neste trabalho).Passo 4. Na página de renderização, click the job > export the file > download.Aqui estão alguns projetos que também utilizam um serviço de cloud rendering.ConclusãoUma boa cloud rendering para Maya pode tornar seus arquivos renderizados mais rápido e melhor. Sem mencionar que a maioria dos serviços online cloud rendering oferecem vouchers gratuitos de renderização. É bem sabido que a Fox Render****farm é um excelente render farm no mundo de CG, então se você precisa encontrar um render farm, por que não experimentar a Fox Render****farm, que está oferecendo um teste gratuito de $25 para novos usuários?Obrigado por ler!


How to Use Blender's EEVEE Engine

How to Use Blender's EEVEE Engine

2023-01-13

Maya Render Farm

As the leading cloud rendering service provider and best Blender render farm, Fox Render****farm, brings to you a tutorial about how to use Blender's Eevee engine.Blender is a great 3D software with a real-time rendering engine - Eevee. Similar to unity3d and unreal, this engine can create, adjust, and represent 3D objects and materials by using PBR workflows.How to Use the EEVEE Engine:EEVVEE uses the PBR workflow, which is the same as unity and unreal, and has both Metallic and Specular workflows. As shown below, you can choose the nodes you need: There are four textures required for the Metallic process:Base ColorMetallicRoughnessNormalThere are four textures required for the Specular process:Base ColorSpecularRoughnessNormalOf course, these four textures are basically required. If you have other textures, you can import them for free.Below we import the model Correspond to the texture, plus HDR mapWell, the effect is not bad. But there are a few more features that make the picture look better, and then find the Post Processs Stack in the properties bar. They are:Ambient Occlusion Ambient OcclusionMotion Blur motion blurDepth of Field Depth of FieldBloom glowHigh energy partBlender's latest version of the Cycle engine has joined the Principled node of the PBR process.This node is used to render the material that uses the PBR process offline.Already convenient, right?However, after seeing a lot of official documents and trying, I found that the Principled rendering node, working in both the Cycle engine and the EEVEE engine, and the effect is close!What does this mean?The following two images are shown, which are the same model, the same set of textures, the same material nodes, and the same lighting. In short, the settings are the same, that is, the real-time rendering and offline rendering engine switching. From-cycle Eevee engine screenshot Only switch the Cycle engine and open the window for real-time renderingAlthough there are differences, they are basically similar.The traditional rendering process is as follows:Vray or Arnold for MayaDraw a textureIt may be a PBR process, perhaps a traditional process, in a substance painter, Quixel production, or other software. However, there is no guarantee that the material preview will be the same as the final render.Rendering testImport textures into Maya and test renderings using Vray, Arnold, or other rendering engines. And confirm the final model material assets.Adjust the light according to the lensThe rendering staff lights in different movie scenes according to different environments. With Maya plus Vray Arnold, rendering tests can take a lot of time and eventually render the final film.With Eevee's Blender, these four steps will reduce the time of production and are more friendly to the creator:Blender_EEvEE_Cycle_workflowDraw a textureWhether you are making a texture in the substance painter or Quixel, as long as it is a PBR material, you only need to pay attention to the effect of the material at this time, because the effects of the EEvEE and Cycle engines will be basically the same.Rendering testImporting the texture of the PBR process into Blender, whether it is EEvEE or Cycle engine, the performance is quite consistent with the software for making the material.Here, you can use the EEvEE real-time rendering engine to quickly create a variety of lights, a variety of ambient light, and quickly view the interaction between your material and light.And you can switch directly to Cycle without any adjustments and directly render offline. Cycle can also render in real time in windows, and it is very fast.It also saves a lot of guessing and waiting time. It is more convenient to light up than before, and the effect can be seen directly, and the rendering is basically the same.Adjust the light according to the lensIn this step, the rendering can be quickly illuminated with EEvEE and interacted in real time. You can see the interaction of light with the surface of the object, closer to the final result.Then directly switch Cycle offline rendering to further adjust the final rendering of the finished product, real-time and fast.We hope this will give you some inspiration and help. Fox Render****farm is an excellent cloud rendering services provider and render farm for Blender, so if you need to find a render farm, why not try Fox Render****farm, which is offering a free $25 trial for new users.Article From DigitalCat


Can Maya Be Used to Make Games?

Can Maya Be Used to Make Games?

2022-11-11

Maya Render Farm

What is Maya?Autodesk's Maya is the renowned 3D modeling and animation software that integrates the world's most advanced modeling, animation, visual effects and rendering technologies into a complete solution.Maya's CG functionality is very comprehensive, including modeling, particle systems, hair generation, plant creation, costume simulation and more. It can greatly improve the efficiency of development, design and creation workflows in film, television and games. It enables realistic rendering and is a high-end production software of cinematic quality.Can Maya Be Used for Games?Yes, Maya can be used to make games.Maya is widely used in the game design industry, especially in next-generation games, which require high-quality graphics. But it is not enough to use only one software for modeling. Commonly used software is Maya, 3ds Max and Zbrush. These three have their own strengths and all need to be mastered. In actual game projects, the final version required by each company may be different. Some need the final output in Max format, some need the final output in Maya format. So you'd better be skilled in other software as well.In fact, in game development, Maya is mainly involved in modeling and materials. For the games, the material is the most important. Materials can enrich the details of a model, and making materials requires you to have a certain art foundation.Special effects are usually made with game effects software, such as Unity3D. Although Maya can also do special effects, it is generally used in film and TV column packaging, etc. You should be clear about one thing, the game is different from the others, it relies on the network transmission, so if you make the game a very large file, then the game is not able to run, and the network will become very stuck, because in fact the online game is to transfer pictures for each user. So you have to understand how to express more details with the smallest file within the game, that's the key.How to Speed UP Maya Rendering?Rendering is one of the most important and time consuming parts of working with 3D software. The renderers that work with Maya are Arnold, V-Ray and Redshift, but rendering speed may not be improved much by using renderers alone. So is there any other way to improve Maya's rendering speed?V-Ray 6 for Maya is Now Available!Rendering can be sped up several times faster using render farms such as Fox Render****farm, the CG industry's leading cloud rendering service provider and render farm. As a Maya render farm, Fox Render****farm offers a $25 free trial for new users. If you don't know how to use it, you can read this article about how to use Fox Render****farm.ConclusionIn summary, you can use Maya to make games. But you have to keep exercising your art skills, modeling skills, and master other 3D software like 3ds Max as much as possible. This way you can successfully solve whatever difficulties you encounter. In addition, if you need rendering help, Fox Render****farm can give you the maximum possible help with cloud rendering services so that you can finish your work before your deadline.


Animated Short Film "Survival" Scene Production Analysis

Animated Short Film "Survival" Scene Production Analysis

2022-07-01

Arnold for Maya

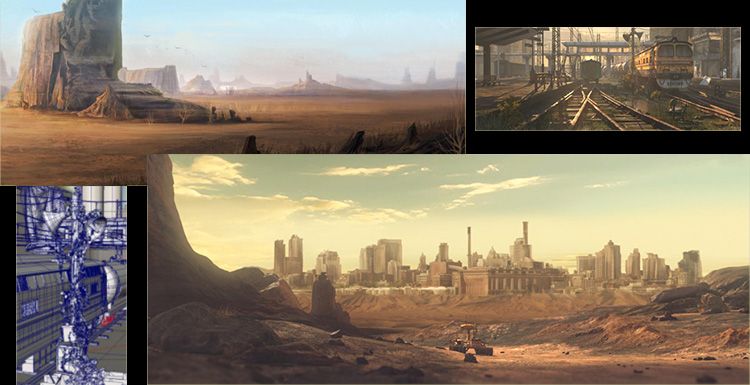
This time, our render farm brings you an analysis of the animated short film "Survival" scene production. As the leading cloud render farm in the CG industry, Fox Render****farm has always been committed to providing artists with affordable, reliable and secure cloud rendering services. It also encourages outstanding artists to make good works and promote the production of their works, and let more people know them and their excellent works.This article brings about the production and analysis of the animated short film "Servival" produced by CG artists Li Yicong, Sun Ningning, Xing Luyue, Shi Tao and Li Yongcong. The software used is Maya, Arnold, AE, Nuke and so on.A brief introduction to the short filmThe short film tells that in a city where energy is exhausted after the end of the world, a lonely little robot relies on finding a waste battery in the city every day to live alone, until he finds that the city has no more disposable batteries to use, but he has no choice but to go home. Packing up the luggage, reluctantly pulling his own stroller, leaving the city, embarked on the road to find new energy.The specific production processPrevious periodThe script is written by members and then determined through multiple discussions based on the technical level and conditions that can be achieved, and then the character design and scene design by the pre-art.MemoriesModelingI found a lot of references during modeling, and I used to make up for a mechanical principle for a while. However, the animated character and mechanical design are not exactly the same. Consider the functions of action binding, emotional expression, and plot. Figure 1 is a partial reference of the character. The mapping is mainly used for Ddo and Mari.Role modelLight renderingScene oneOne of the scenes is the home of the robot, which lives in an abandoned train station. This lens acts as an empty mirror to ease the rhythm and explain the living environment.The robot looked for a day's battery, and the harvest was not much. Because it was far away, it almost lost a life on the way home. The lighting is set in the evening, except that it feels very dull, and it also implies that the small robot has lived in this city for a long time. On the other hand, the evening light effect, the light ratio is strong, the angle between the light, the camera and the object is relatively small, and the surface of the object will produce a beautiful Fresnel reflection. The figure below shows the material properties of the railway.Here you can use three or more textures to represent an object, color map, reflection map, and normal map or bump map. If it is close-up, you need to add a roughness map to make the object produce more rich changes.Backlighting also works well for translucent objects, such as the dirty old glass on the bridge, the grass on the ground, and the semi-transparent effect of all the plant leaves on the vine. In addition, the grass adjusts the wind output in SpeedTree and then imports it into Maya for material adjustment. Special plants need to be created in SpeedTree. Add force field to shape the plant into the shape and growth trend that you want, and then export. Creating plants in SpeedTree allows you to export wind animations to Maya, and plants can move to increase the authenticity of the scene.&x3C;p class=‘img-source’>SpeedTree SoftwarePlants imported into MayaCreate a render layer in Maya, put all the objects into the new render layer, and then add the Arnold base material for layer coverage so that the entire scene is the same material and the texture is ignored. Benefits are,First, when lighting, it can be not affected by the texture of the surface of the object. It can observe and adjust the position of the light and shadow well, and use light and shadow to compose and shape the volume of the object.Second, remove the texture, refraction, etc., the test rendering speed is fast, the adjustment can get feedback quickly. Here you can see that this picture is not completely retrograde, the light source is to the left. At the time, when lighting in the scene, I hope that one side of the locomotive can produce a bright surface, and the lower left corner is too bright, so that the light of the whole scene is too average.Adjust the lights and start making material adjustments and renderings. If you find that many places need to be adjusted after rendering, you can reduce the sampling of all aspects, in order to save rendering time, after many adjustments to the screen you want, if you want the work more realistic and reduce the rendering time, you can use a Maya render farm.In Arnold, it is generally necessary to separate several layers,Scene 2In the home of the small robot, this is a parting scene, where the warm shades of light are used to make a warm and sad feeling, so use the Maya spotlight to simulate the sun's rays, let it produces a light fog to simulate the atmosphere, which can increase the drama and authenticity of the scene.Scene 3Post-production and composite editingThe short film uses Arnold to render a multi-channel synthesis scheme with a total of 13 layers, which is finally synthesized in Nuke and AE.


Maya Tutorials: Game Props Modeling

Maya Tutorials: Game Props Modeling

2022-07-01

Maya Render Farm

Fox Renderfarm, a leading cloud rendering service provider and render farm** in the CG industry, will share with you the game props model produced by Maya. In this Maya tutorial, we will introduce how to create a game-style 3D model based on conceptual design drawings, from ZBrush carving to high poly and low poly UV texture production.The following is a brief description of the process of making 3D models of games. I hope that you can have some understanding of the models used in games.ConceptBefore making a model, there are usually some conceptual drawings as reference for making. In this case, you can directly put the reference drawing in the production software Maya as a reference.ModelingBefore importing into ZBrush for sculpting, you can first do some preparation work in Maya. If the model is relatively simple, such as stone, tree trunk, floor tiles, etc., they are relatively simple. You can use ZBrush to sculpt High Poly directly without making a Low Poly model. If the model is more complex, such as a biological model (animal or the like), you can make a Low Poly export OBJ file in Maya and sculpt it in ZBrush.ZBrushImport the low poly model into ZBrush for sculpting. From Blocking, make sure that the scale is appropriate. The most important thing is that the model does not deviate from the conceptual diagram. It is necessary to determine the overall ratio first, and then it is the part of some accessories, and finally the detail part. This process only uses the basic brush.RetopoThe number of model faces sculpted by ZBrush is very high, which may be as high as hundreds of thousands of faces, or even millions. Such models cannot be used in-game engines. Therefore, the high poly model sculpted by ZBrush needs to be topologically a low poly before it can be used in the game engine. The topology process uses a topology software TopoGun, TopoGun can help the model Resurfacing and Maps baking, and the details of the model will not be lost. If you are making a single static map, then the model does not need to rig bones, it is not necessary to make low-poly and Normal map.UVSAfter the topology is completed, it is the job of the UV. Normal maps can be baked after the UV is split. The UV can be organized using some plug-ins included in Maya, or can be produced using other software. You just need to expand them and adjust as needed. Try to be as reasonable as possible.Schematic diagram of UV deployment and placementNormal mapBefore bringing the model to Substance Painter, you need to bake the details of high poly onto the developed UV to make the texture. Baking and texture can be made using Substance Painter or Toolbag, especially Substance Painter has many tools and functions, which is very suitable for realistic and cartoon-like texture production.These textures represent different information such as Normal map, Specula, Hight, and Gloss. The higher the accuracy of the texture, the better the final display effect of the model.Import the baked texture into the most commonly used Substance Painter software to create PBR textures. Some parts can be adjusted using some preset textures, and then output different textures according to different needs.


Maya Tutorials: Production Process of 3D Artwork Batman(1)

Maya Tutorials: Production Process of 3D Artwork Batman(1)

2022-07-01

Maya Render Farm

CG character artist Nealxia shared his "Batman" project and explained in detail the production process of models, UVs, textures, renderings, etc.. Your TPN render farm and cloud rendering services provider, Fox Render****farm hopes these experiences can be helpful to you.IntroductionBatman is a superhero under DC Comics, and in my heart, he has always been a shining image representative who grew up with me. The first time I knew Batman was the Batman game. I was immediately attracted by his mysterious, cold, dark temperament. I still like this role very much now, and I always look forward to the opportunity to do memorable work for my idol. Finally, I finished this work in my spare time last year, I hope you like it.ReferencesBefore I started, I collected a lot of material about Batman. The styles of the picture materials are both realistic and cartoon. In the end, I decided to use Nolan’s film "Batman: The Dark Knight" as the model since I really like this movie.Modelling:After determining the appearance of Batman, we must determine a basic model. I found one from previous projects as a basic model. If it’s too time-consuming to make from scratch, the best way is to use the resources at hand to apply what is suitable, and do it yourself if it’s not a proper one. Displacement pump or normal can be used in the production process to show the details of the model.The process of making Batman armor is done in Maya. After determining the approximate shape, the armor is added to the character model. Building these hard armor models in Maya is quite quick and convenient: first, create a plane, and then continue to extrude the edges of the plane model with the Extract Edge command, and continue to cut until you achieve the effect you want.


3ds Max Tutorials: Semi-realistic 3D Game Scene Interior Production Sharing (2)

3ds Max Tutorials: Semi-realistic 3D Game Scene Interior Production Sharing (2)

2022-07-01

3ds Max Render Farm

Fox Renderfarm, as the best Maya render farm** and cloud rendering services provider, in the CG industry, the tutorial we shared for you this time is from the 3D artist Thepoly, on how to use 3ds Max and Maya and other software to make a semi-realistic 3D game scene interior production process.3ds Max Tutorials: Semi-realistic 3D Game Scene Interior Production Sharing (1)Taking the wooden table as an example below, first of all, we must determine the material to be sculpted and then look for the reference picture corresponding to it. Because the wood in the scene is too old, you need to find some pictures of old wood when looking for reference pictures, for example,The carving process needs to be combined with actual life, so as to achieve a more realistic effect. In this scene, the wooden table is a bit decayed, so the edge of the table will not be made into a hard and sharp right-angle structure, so you can use a brush to make the right-angle part of the edge more smooth when carving. Reflect the texture to be expressed. Coupled with appropriate deformation, it can more vividly increase the visual impact (the modified place is slightly adjusted with the Move brush).The wood in the scene has to make a sense of oldness, so cracks are a good way to show that the objects are worn out, and reference pictures are also needed at this time. For example, the cracks on the window plate can be carved according to the cracks in the reference picture. This can reflect the material better, more realistically, and faster.The final high poly showed as below:Low polygon model and bakingThe final low-poly model uses ZBrush to complete the reduction and then imports into Maya to make the final low-poly model. This can get the low polygon model faster, but the wiring will be less neat. Note that near 90-degree angles, it is necessary to distinguish between smooth groups and split UVs.The final baking used Marmoset Toolbag 3.Material productionAfter baking all normals and IDs, import Substance Painter to make materials. It is worth noting that the normals baked in Marmoset Toolbag 3 and Maya use OpenGL mode in Substance Painter, and the normals baked in 3ds Max use DirectX mode. After successful import, the remaining textures are baked in the texture set-baking model texture.Wall material basic processFirst, we make the intrinsic color of the material. The intrinsic color layer can add filters to increase details.To add dark colors, use the Dirt generator. Add a drawing layer to repair some unsatisfactory areas. Add bright colors and color changes to create a rough effect of wall corruption. Here mainly relies on hand-drawn layers to modify. Continue to add color changes and roughness changes. Try to get as close to the real effect as possible.Finally, you can add an adjustment layer to increase the brightness. The material made in Substance Painter should be led to Marmoset Toolbag 3, which will be a little lower than the brightness seen in Substance Painter. The wall material is finished.The furniture in the scene is gray and dark because of the old feeling. The damage and abrasion are to reflect the original color of the wood, so the saturation of the color will be higher than the color of the surface.3. RenderingBefore finally importing into Marmoset Toolbag 3, the lights must be set before rendering. Establishes the main light, and the auxiliary light supplements the light source to maintain the brightness of the picture. And to turn on high DPI and oversampling, turn on GI global illumination and AO environment occlusion.The final effect showed as below:Fox Renderfarm** hopes this learning and sharing can help you. If you want to know more about 3D art, rendering and events, you can follow us. As the industry's leading cloud rendering services provider and 3ds Max render farm**, Fox Renderfarm** have continued to bring the latest and most up-to-date news of the 3D industry. Thanks for reading!


Creating A Game Character “Yae Sakurain” In ZBrush And Maya

Creating A Game Character “Yae Sakurain” In ZBrush And Maya

2022-07-01

Maya Render Farm

In this article, Fox Renderfarm, the best render farm** and cloud rendering services provider in the CG industry, will share with you a Maya tutorial about how to create a game character “Yae Sakurain” in ZBrush And Maya. This tutorial is written by 3d Artist Sakura.This style is to use three-dimensional methods to achieve the artistic expression of two-dimensional visual style. So I chose the character Yae Sakurain in the game "Honkai Impact 3'. This is a challenge for me. This article is from looking for references in the early stage to the final model making.This article will not describe too much technical skills, but hope to share the production process and some ideas from a design perspective.Software used:PureRef: Reference collationZbrush: Characters &x26; costumesMaya: Topology &x26; UVXgen: GroomingMari: skin mapSubstance Painter: texture map of other partsArnold: lighting material renderingInspirationWhen I saw the design of the character Yae Sakura in the "Honkai Impact 3'', I was attracted by its design, personality and expressiveness. Its facial features and ears are a bit like a bunny girl, as well as color matching and body proportions.ReferenceThe difference between reference and inspiration is that reference is based on having inspiration as a general direction guide, and then adding more. Collecting references helps guide oneself to find the right direction, and at the same time it is not easy to go wrong in the production process.It is a more realistic style. At the same time, I also found a lot of references for Japanese kimonos and skirts, head styling, expressions, hair, etc.The character requires a lot of refinement of key features to better show their ideas. This personal project took a lot more time to find references than my other projects.ModelingLarge stage and detailed stageIn the large-scale stage, I first built a basic structure in Maya. I like to start with the whole and grasp the overall proportional relationship to a certain extent. It can be seen that this role belongs to NPR. The characteristics of NPR mainly focus on styling design, large scale relationship and color, and the treatment of light and shadow.If you do this directly, the direction is incorrect. And the structure on the model will be too flat. Especially using the PBR process, there is no cartoon material effect, such a model does not have enough features.So through the combination of these references, a rough proportion is formed in the mind and built in the software. In this way, we can slowly enter the detail stage with a holistic way of thinking, without chaos. Of course, you can find some models to fight together and adjust the shape to save some time. Various methods can be tried.In the detail stage, I will try my best to express the different characteristics of the model, and then the model can show some sense of hierarchy at this stage. This can predict some effects after the texture map is applied. But it does not mean that the model is finalized at this stage. After all, although this has a reference to the original painting, it is a secondary creation on this basis.So if the texture map is not suitable, it will return to the model stage for adjustment. After the appearance is determined, the detail stage is also very important. In many cases, the comparison and level changes between models are presented by the characteristics of different shapes.For example, the folds of the kimono, the embroidered patterns on the top, the shape of the skirt, the changes in the fold structure on the top, and how many different model structures are on the mask, sword, and rope. Observe the above features, analyze and disassemble them and make them all, if they are not good, you can delete them.For this project, I used Zbrush mainly to deal with some fabric and shoe models. Clothes and shoes do not need to be worn, but they are not completely unused. So some folds were added to make the model look authentic.I didn't use Marvelous Designer for the clothes, because those things are not complicated, and almost all of them are made directly using ZBrush.After completing the topology in Maya, occasionally I will return to zbrush to adjust if I am unsatisfied, and repeatedly modify it back and forth. At the same time, in order to get more structural levels and details on the model, and to make some rhythmic distinctions between different models, the subdivision of the cloth is still given enough surface.Primary and secondary and rhythm changes. This part needs to be finalized at the model stage. Regardless of whether it is clothing or props, I have made trade-offs as much as possible in the details of the relationship with the characters. After all, it can't be details, or no details. There will be a lack of rhythmic changes in the expressiveness of the entire styling. I used the appearance changes of clothing and skirts to break the overly flat outline of the entire model, and at the same time used props to reinforce this.TexturingMari and Substance Painter are used in the texture part. I first finished making the skin. Then the most important part begins, the production and color matching of other parts, as well as the material details. Of course it was done separately, for the same reason.For the texture mapping of the components, observe the real photos made by others or analyze the logical hierarchical relationship between them. It can be done layer by layer, the important thing is to observe and disassemble and analyze. For example, have you tried to show some texture particles, dirt, thread ends, and high light reflections on the clothing?In fact, to some extent, we need to have a certain understanding of the properties of the shader, whether you know how to use basecolor, metallic, roughness, normal, and sss textures. How do they affect each other? Basic knowledge is important.One of the more important reasons that problems exist is that there are too many details, and there is no planning in the early stages, resulting in details everywhere. One difficulty with this character is that the costumes are white. White is a color that is harder to produce effects. If you don't do it, the texture map of the entire costume will appear very thin, and doing too much will steal the attention of the character.In the end, I chose to add some different types of embroidery effects to the white clothing, especially the cherry blossom pattern on the large sleeves, to ensure that it conforms to the cultural background. It’s easier to say, but I don’t know how many times I have tried repeatedly when I did it. The color matching is relatively good. The design of Yae Sakura has helped you to adjust the color matching in place, mainly controlling some parameters such as saturation.Grooming and lightingAfter finishing most of the texture maps, I will try to set up a set of basic light sources in the scene, mainly for auxiliary hair test rendering.These two are the core references:Based on these two references, I found some other references. The final references are as below.First, solve the large structure and the direction of the hair with the larger main body. Then add some fine splits based on the big trend, and finally add some broken hairs and so on.It can be seen that the hairstyle and lighting still affect the facial emotion expression of the characters very much. Take a closer look at each of them.I try to grasp the characteristics of the role of Yae Sakura, such as the feature of her hair spreading to the ends, and the hierarchical relationship between bangs and temples. And the spread of the long hair rests behind the open styling. Because I didn't want this character to be too cartoonish, I looked for some realistic style references.Lighting rendering, first of all, I wanted to make it in the style of the first picture. After I have a foundation, I hope to express the feeling of sunlight on the hair and body in the fourth picture. At the same time, because there is a stronger light source in the scene, the overall light will be brighter. I found the second picture and the third picture to supplement. Of course, there are still many pictures to support. In order to better refine the views of this article, I have selected these four representative references.SummaryThe conceptual design and reference diagrams before making are very important. Basic software technical knowledge and design theories can help you improve your work. Details, proportions and composition are very important for perfect results. If you are looking for a cloud rendering service, why not try the fast and TPN-accredited cloud render farm**, Fox Renderfarm**, who offers a free $25 trial? Thanks for reading!


Welcome to join us

render farm free trialCHRISTMAS SUPER SALE

Recommended reading


Top 9 Best And Free Blender Render Farms of 2024

2024-08-30


Revealing the Techniques Behind the Production of Jibaro "Love, Death & Robots", Which Took Two Years to Draw the Storyboard

2024-08-30


Top 10 Free And Best Cloud Rendering Services in 2024

2024-11-08


Top 8 After Effects Render Farm Recommended of 2023

2024-08-30


Shocked! The Secret Behind Using 3D to Make 2D Animation was Revealed!

2022-05-11


How to Render High-quality Images in Blender

2024-11-18


Easy Cel Shading Tutorial for Cartoon in Blender Within 2 Minutes

2022-07-01


Top 5 Best and Free 3d Rendering Software 2024

2024-01-19


Partners

Business Consulting

Global Agent Contact:Gordon Shaw

Email: gordon@foxrenderfarm.com

Marketing Contact: Rachel Chen

Email: rachel@foxrenderfarm.com

Message Us:
Newsletter
Keep up with our latest software updates, special offers and events!
Copyright © 2024 FoxRenderfarm.com. All Rights Reserved.