Fox Renderfarm Blog

Top 5 V-Ray Render Farms in 2025
V-Ray Render Farm
Chaos' V-Ray is a powerful rendering engine widely used in the computer graphics industry. It provides high-quality and realistic rendering for various 3D software applications such as 3ds Max, Maya, Cinema 4D, and more. V-Ray offers advanced lighting and material options, global illumination effects, and efficient rendering algorithms, allowing artists to create stunning visuals for their projects.Using V-Ray for rendering can achieve higher quality results, but sometimes V-Ray rendering can be slow, taking several days to render just a minute of video. Apart from making some adjustments in your project files, another option to speed up V-Ray rendering is utilizing a V-Ray render farm for faster and more efficient rendering.Next, as a leading render farm and cloud rendering service provider in the industry, Fox Render****farm will introduce you to some excellent V-Ray render farms.1. Fox Render****farm - Best V-Ray Render FarmFox Render****farm has over 20 years of experience in cloud rendering services and as a V-Ray render farm, it is committed to providing the best V-Ray cloud rendering service. In addition to V-Ray, it also supports 3D software such as Cinema 4D, 3ds Max, and Maya that can work with V-Ray. Both CPU and GPU rendering are supported. They have an online rendering platform as well as a desktop application, both of which are constantly maintained and updated. Currently, they offer a $25 free trial for all new registered users. Additionally, they provide real-time chat support where you can reach out to their customer service representatives if you have any questions about V-Ray rendering services.2. RebusFarm - Your V-Ray Render FarmRebusFarm is a renowned render farm service provider that supports various rendering engines, including V-Ray. It is not exclusively a V-Ray render farm but offers support for V-Ray along with other popular rendering engines. With RebusFarm, users can submit their V-Ray projects for rendering and benefit from the farm's powerful infrastructure to accelerate the rendering process. RebusFarm provides a user-friendly interface, reliable cloud rendering services, and efficient support for V-Ray and other compatible rendering software.3. iRender - Powerful V-Ray Render FarmAs a V-Ray render farm, iRender is a cloud-based rendering platform that specializes in providing efficient and powerful rendering services for V-Ray users. They offer support for V-Ray rendering with both CPU and GPU options. iRender provides a user-friendly interface and scalable cloud resources, allowing users to render their V-Ray projects quickly and effectively. Whether you need to render architectural visualizations, animations, or product designs, iRender can help accelerate the rendering process by leveraging their dedicated infrastructure and computing power.4. GarageFarm - Effective V-Ray Render FarmGarageFarm is also a V-Ray render farm. It is a popular cloud rendering service provider that supports various rendering engines, including V-Ray. With GarageFarm, users can submit their V-Ray projects for rendering and take advantage of their powerful infrastructure to speed up the rendering process. GarageFarm offers flexible pricing options, extensive software compatibility, and 24/7 support to ensure a smooth rendering experience. Whether you are working on architectural visualizations, animations, or other V-Ray projects, GarageFarm can provide the rendering resources needed to achieve high-quality results in a timely manner.5. Super Renders Farm - Affordable V-Ray Render FarmSuper Renders Farm is a cloud rendering service provider that supports V-Ray rendering along with other popular rendering engines. Super Renders Farm offers a user-friendly interface, flexible pricing options, and powerful cloud infrastructure to accelerate the rendering process for V-Ray users. You can submit your V-Ray projects to the Super Renders Farm platform, and they will distribute the rendering workload across their network of high-performance servers to deliver fast and efficient results.ConclusionWe hope you find the best V-Ray render farm for you. But if you can't decide which one to use, try Fox Render****farm, which is also a TPN-Accredited render farm and is now offering a $25 free trial for new users.
Why V-Ray Render is Black in SketchUp And How To Fix it?
SketchUp Render Farm
When many people encounter rendering with V-Ray for SketchUp, the rendered image is all black or partially black. As the best CPU & GPU render farm, Fox Render****farm will explore with you the reasons of v-ray black render problem and solutions.The Reasons and Solutions When Rendering Image Become Black in V-Ray For SketchUpReason 1. SketchUp's file storage mechanism is different from other softwareThere is a case where SketchUp's file storage mechanism is somewhat different from other software. It packs the model and texture in a SKP, so even if you don't copy the texture file, SketchUp can still recognize it, but V-Ray must need a texture path. So, when the computer or the path have been changed, the V-Ray texture map was actually wrong, so the diffuse texture Gamma correction was biased when the file was opened.Solution: We can delete all the data of V-Ray in the extension program, and then reset all the materials, lights, and rendering parameters. And to force the back of the model to be hidden. If it is still black, try again to adjust the background to white.Reason 2. The sky is rendered blackSolutions: Please check the following items:Methods 01. Whether the background is on, whether the average color is black, whether SKY is on, and whether SUN1 is linked.Methods 02. Whether the default light source starts, reset the Option.Reason 3. Rendering glass appears blackV-Ray for SketchUp is often prone to appear black in rendering glass because VR has highly reflective objects such as glass, mirror, stainless steel, indicating that the inherent color of the material (diffuse reflection) is itself the black color, plus nothing around the object, can naturally reflect the inherent color of the diffuse reflectionSolution: The solution is to place some detail around the object that can be reflected, or to lighten the color of the diffuse reflection. If the glass material is normal (check Fresnel, etc.), if you are using single-sided modeling, you can flip the surface, and the one side has front and back.SummaryThis is all Fox Render****farm's analysis of the v-ray rendering black problem, hope you solve your problem successfully. Fox Render****farm is a very powerful, safe and fast cloud rendering farm, and you will never encounter such problem if you use Fox Render****farm. Fortunately, Fox Render****farm supports most popular 3D software, renderers and plugins incluindo V-ray, and it offers a free $25 trial for new users who sign up, so just give it a try!
Tutorial: V-Ray for 3ds Max Making Forest Park Restaurant
V-Ray for 3ds Max
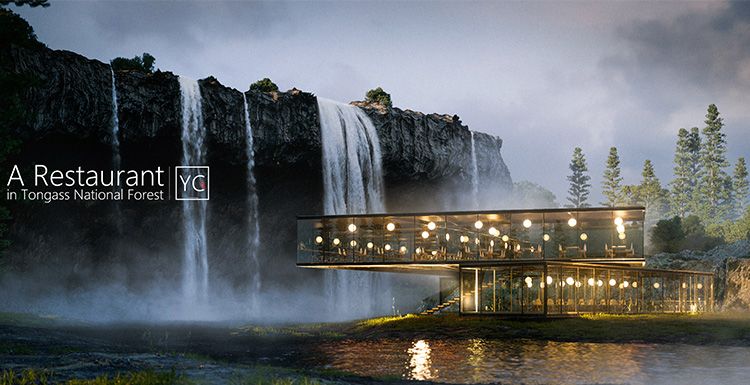
As the leading cloud rendering services provider, Fox Renderfarm is here to tell you how to make forest park restaurant using V-ray for 3ds Max.The case study presented to you this time is based on a person's conceptual design - a restaurant that is intended to be built next to a waterfall and surrounded by vegetation. From design to final performance, it is all done by one person. The overall production idea is worth sharing with you. The software used is 3ds Max, V-Ray for 3ds Max, Photoshop.1. Architectural Modeling and Material AssignmentIn the early stages of design, conceptual sketches can be drawn in the form of paper and pencil. According to the characteristics of the Tongas National Forest Park, combined with personal preferences, the general appearance of the base is restored and the general shape of the restaurant is designed.The 3ds Max was then used to complete the modeling of the restaurant, refining the details of each part of the restaurant from three dimensions.Because this design does not require the display of interior details, some ready-to-use chair models can be used directly, without the need for exquisiteness. Together with the temporarily created table and luminaire model, it is placed inside the building, so that the interior has certain details related to the subject.After the main body model is completed, the corresponding materials are given to each part. The structural part of the building is mainly black steel. The material is generally created by the method of making metal. However, in order to make the surface of the material more vivid, a texture of stainless steel is used as the mask, gloss map and bump map, the metal surface has a slight color change and reflection gloss changes.The following is a node diagram of the material. In addition to the base material, the dirt effect is added to make the stain effect appear on the concave corner of the steel. Of course, this effect can be selected by adding PS in the later stage.Since the main body of the building is far away from the camera, all aspects of the details can be appropriately reduced, especially the object that is occluded. Therefore, the rest of the restaurant model uses only three material balls, one is glass and the other is wood (for table) The same one), one is stainless steel. Stainless steel may be a more interesting material, but it is not clear in this scene, so it only gives a diffuse reflection and bump.In the end, the complete building body was initially obtained.2. Scene LightingThis step can be made according to personal habits. Here, lighting, modeling, and materials are synchronized. At the beginning of the modeling, the lighting is placed according to the design, because the lighting is an indispensable part of the design. Because it is a conceptual scene, the illumination does not have to be too limited to reality. It can be adjusted according to preferences. In order to highlight the existence of the main body of the building, you can use the shadow to block the less important places, and at the same time highlight the context of the scene and form a contrast between cold and warm. It even reduces the difficulty of the late fog.The light source of the scene is mainly divided into three parts.The first is V-Ray sunlight, from the perspective of the camera, from left to right, and the sun is low.The second is a dome dome lamp loaded with an HDR from Peter Guthrie at dusk, but the overall tone is cold.The third part is the lighting in the building. The spherical light of the v-ray is placed directly inside the luminaire. Combined with the double-sided material properties of the luminaire, the lighting environment can be guaranteed while ensuring the visual effect of the luminaire itself.Finally, four spotlights are used. Illuminate the bottom of the second floor to highlight the outline of the building's main body.3. Environmental Modeling and Material AssignmentThe next step is to start the environment modeling, first creating a large plane that covers the range seen by the camera and uses it as the ground around the building.However, the surrounding area of the restaurant is not a flat ground, there is a river passing by, you can use the drawing function in the editable polygon to create the bump effect of the ground, and use the noise modifier to further add subtle height changes to the ground. At this point, create a plane, use it as a water surface, combined with the ground with high and low changes before, easily produce the effect of water. Of course, when brushing the terrain, you should consciously shape the riverbed instead of carving it at will. Use a similar approach to create more undulating relationships for the ground and get a preliminary environment.The ground is almost done, and there is no difficulty in this step. Next is the cliff waterfall, you can first use the spline to hook out the plane of the cliff, then use the "clothing generator" modifier to generate the grid, and finally use the "replacement" modifier (placed the noise map) to generate the height difference Of course, use the soft selection to determine the area where the bump is to be generated before using the noise. In the upper part of the cliff, considering that the camera could not see her full picture, I only built a small part of the top of the cliff and then combined it with the model.Use the plane to pull out a simple shape, then use the turbine to smooth the mesh, and finally use the noise modifier to give the model a bump change that simulates the rough effect of the rock surface. However, a cliff does not seem to be enough, so I copied a few more, and finally got the following effect, the environment has been basically built.The environmental model has been roughly completed, and the corresponding materials are given to the various parts of the environment, including the dirt on the ground, the rocks behind the restaurant, and the rocks on the cliff. In order to reduce the workload, it is not intended to increase the details on the model, but to directly use the texture with sufficient information to achieve complex surface effects.Real displacement Texture by Christoph Schindelar is a seamless map of 3D scanning with accurate diffuse, normal, gloss and displacement information to create realistic and reliable surface effects.In order to show the high quality of the material, I made a few small tests. The following three materials are given to the scene, and the distribution is as follows.4. Vegetation AdditionHere we use the itoo's grass model, convert it to a proxy, and use the advpainter for manual distribution.5. Rendering and Post-ProductionThe scene is now almost processed, and finally the remaining material is filled, such as the water surface, and finally a complete scene. Raise the render parameters and add the render element zdepth (set the distance according to the scale of the scene) and change the output resolution to 2560×1440. Let's take a look at the changes from model to lighting to final rendering.After rendering the basemap, put it into Photoshop to adjust it. Content like waterfalls and water fog, which is handled later in the post, is very advantageous for still frames. Because the color of the waterfall itself is not complicated, its characteristics are mainly reflected in the light effect of water vapor and the water body on both sides. At this time, you only need to use the polygon to simply pull out the waterfall, and process it into black and white, then use the color scale to remove the unnecessary parts, and finally repair it with a brush to get a pure waterfall "flowing body". Take one of the waterfalls as an example,The only thing left is to polish. Adjust the overall color brightness and tendency, add a halo to the exposed area, add the lens vignetting effect, and the final result is born.Fox Renderfarm** hopes it will be of some help to you. As you know, Fox Renderfarm** is an excellent cloud render farm** in the CG world, so if you need to find a render farm**, why not try Fox Renderfarm**, which is offering a free $25 trial for new users? Thanks for reading!Article reference article shared by 3d artist Yu Dejie
The Production And Rendering Process Of Office Building' s Night Scene
V-Ray Render Farm
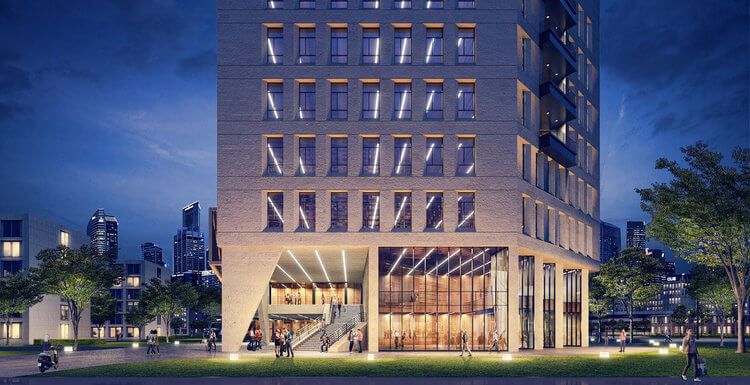
In this article, the best CPU &x26; GPU render farm service provider, Fox Render****farm, will share with you a production and rendering process of office building's night scene. For landscapes and architectural drawings, designers need to grasp the aspects of volume, texture and light efficiency. The following is a case model, although the scale is not very large, but the details are complete.Part 1. Case CollectionBefore you make a production, you can find some reference pictures of the effects. If we are going to make a night scene, then the reference picture is also a night view.Part 2. Model AdjustmentThe original model has been built to the details of the scale, in order to make the model look more perfect, here added the glass frame part of the window frame, floor, and some railings and other handrails. Then, taking into account the scene, and adding some scenery buildings, floor lights and street light poles according to the original general situation of the site. Part 3. Light and MaterialReferring to the building in the case, I first used a night scene HDRI to illuminate the scene, followed by interior lighting, outdoor entrance lighting, ground lighting (illuminated building exterior) and red atmosphere lighting. I only did a simple lighting test, because the intensity of the light may need to be adjusted after adding the material. In fact, I added the light and material synchronously.In terms of material, I chose two concrete materials made by Arroway for the wall and the entrance floor. The rest of the railings, window frames, and glass are of course simply set up, and the textures are not mounted. The interior uses the dark glossy wood flooring material that Thea comes with. After the initial setup of the lights and materials, it is necessary to start a long test rendering. Here are a few test renderings, which relate to the adjustment of the light environment and materials.Part 4. Mapping and ChannelOnce the various parameters have been determined, the rendering begins. This time I used the BSD engine, because the Presto engine will give up some of the lights that are far away, occupy a small distance, have little impact on the picture, and are not easy to detect due to resource saving. However, these lights are considered to be more important. After choosing the right parameters, I waited patiently for more than 3 hours. Since BSD does not use the GPU for rendering, its algorithm is obviously not as good as Vray, and the speed is slower.The following is a map and a channel map. Alpha\Material_ID\Object_ID\Depth will be used in the channel. Others such as Shadow\GI\Diffuse can also be checked to prevent use. Thea is different from Vray**. Checking the channel map will significantly affect the final rendering speed, which will slow down the rendering speed by 10%~20%. Vray** doesn't seem to slow down the rendering speed because of the checkmark. Post-production ProcessSince the normal pattern rendering is not used, the post work is slightly more cumbersome. First of all, the landscape building is replaced with photo material from CGTEXTURE, and the overall light and dark relationship is adjusted to make it harmonious.Adding plant scenes afterwards is also a long process. The reason is that you need to find a perspective relationship and a relationship between light and dark. The latter is the most time-consuming, and this process needs to be done in the reference case picture and in the process of continuous modification and balancing.The method of adding characters and plants to the scene is no different, and it is also an individual activity. After the scenes are added, adjust their brightness and warmth again and thoroughly into the picture.Ultimate Weapon: The Topaz Adjust filter adds a portion of exposure, detail and contrast to unify colors in one shade. After some minor adjustments, I got a picture.That's all. As the leading cloud rendering service provider, Fox Render****farm hope that you will gain something in this tutorial, especially for the built environment, space and light and shadow. Thank you for reading!
3D Tutorial: Noctis Lucis Caelum(2)
V-Ray for 3ds Max
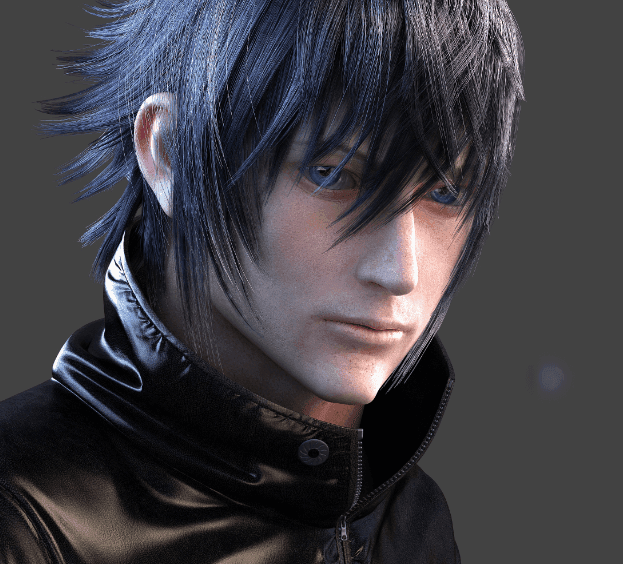
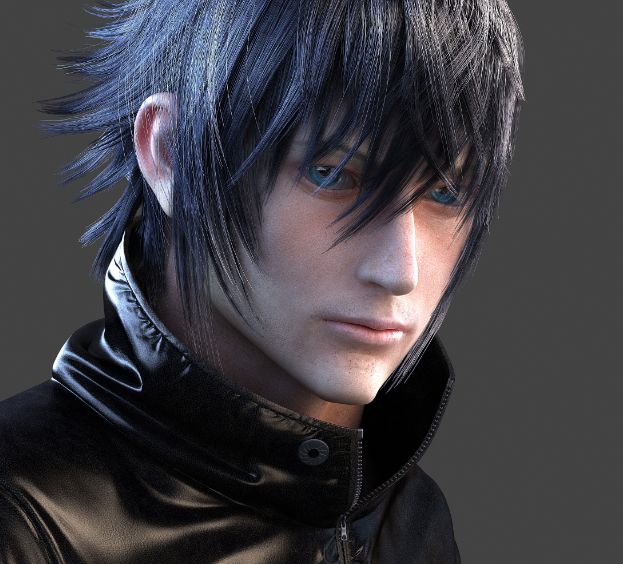
Continue to the 3D Tutorial: Noctis Lucis Caelum(1), your TPN-Accredited cloud render farm, Fox Render****farm still shares with you the tutorial.GroomingAfter the UV is completed, the next step is to make the hair. The hair production in this project uses Hair Farm, which can easily simulate a large number of hair effects in 3ds Max.Perform rough modeling according to the hairstyle in the sketch, and then adjust the shape of the hair through the modifier.Create a rough model first, then adjust the shape.Rendering test,Then use 3ds Max's default hair and fur to make some short hairs.Final render,TexturingNext is the processing of the background props of the character. The texturing is drawn using Substance Design, and 3 textures of AO, CURVITY, and Normal are baked.In Substance Painter, the 3 textures were used for processing.Output:The material of the leather jacket,Skin textureThe skin texture is processed in Mudbox. Firstly, projection maps are used, and some high-quality real-life skin scan materials are used to make bump maps.On the basis of some materials, a better projection material was obtained by modifying the highlights and shadows and then imported into Mudbox for projection.The displacement map was baked in ZBrush.All materials include an Overal Color map, Base specular map, Oil specular map, Scatter color map, Sub-Surface-Scattering, Bump map, Displacement map.Displacement MapLighting settingsThe rendering is done by V-Ray. The basic light is composed of three-point light sources, covering a key light, a fill light, a rim light, but you need to pay attention to the color. For example, if you want white clothes to look textured, the auxiliary lighting needs to be a little blue.The environment uses the following HDR.Final render and compositingThe scene and the characters are rendered separately and finally composited in PS.Finally, I added some halo and motion blur to the scenes, adjusted the contrast and color, and darkened the background, and brightened the upper left corner.When adjusting the color, you should pay attention to integrity. Many of these aspects are related to art theory and basic knowledge. This needs to be accumulated gradually in daily learning.
3D Tutorial: Noctis Lucis Caelum(1)
V-Ray for 3ds Max
This time, your TPN-Accredited cloud render farm, Fox Render****farm shares with you a 3d tutorial about Noctis Lucis Caelum. Software used:3ds Max、Hair Farm、V-Ray、Photoshop、Mudbox、Substance PainterIntroductionCharacter artist Weilong Zhang has been in the CG industry for five years. He shared the production process of the work "Noctis Lucis Caelum" and explained the problems encountered and its solutions.Pre-productionBefore starting, I had a general idea, and then I drew the idea in my mind into a sketch.Before starting to make a model, you also need to consider the composition of the scene, such as the position of the characters.At the same time, glass is used to replace the existence of the visual focus behind the character, and the existence of lines is expressed by the halo and some windows in the background.The bright surface of the window allows the visual center point to be concentrated on the black dark part on the upper right side, which enhances the pressure of the scene and highlights the role.The light of the character gradually changes from right to left, and the background changes from left to right, so that the scene will not be focused and a halo is added to the left in the later stage.Building the modelTo save time, the model uses a head model modification from a previous project, making sure that the scale of the model is similar to the scale in the design diagram. But the most important point is to pay attention to the direction of the bones and muscles for a more attractive character. Of course, in some cases, in order to achieve better results, appropriate modifications can be made while ensuring that the planning structure is correct.Weilong Zhang has been engaged in the production of CG characters for many years, and he has his own production method. His method is to draw all the bones and muscles of the head in his own way, taking into account the angle of the scene, lighting, and the lines of the face.The clothes are also sculpted in ZBrush, but you need to pay attention to the distribution of folds on the fabric to be reasonable.In order to speed up, Weilong Zhang still uses some alpha.The insert stitch 01 brush is used on the clothesline, and the zipper chain uses a brush called IMM ZipperM.Once you are satisfied with the carving of the clothes, use the topology tool ZRemesher to perform automatic topology, and then import it into 3ds Max for adjustment.Skin detailsThe details on the face such as pores can be drawn manually, or you can find some alpha to make the pores.This is the final step, but pay attention to leaving a layer.The glass behind the character is made with the Rayfire.The UV processing is very simple, and it is made by UV Master directly.To be continue..
V-Ray for 3ds Max Tutorial: How To Create a Sniper Robot
V-Ray for 3ds Max
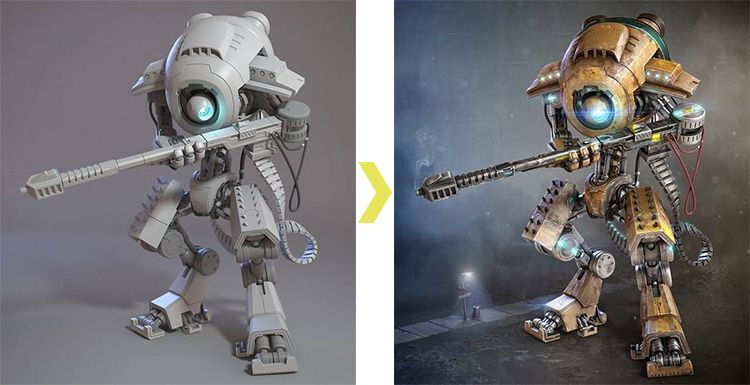
In this production, I will explain how to create a sniper robot using the hard surface of 3ds Max, and include the texture and shader process. Hard surface modeling is also applicable to a variety of mechanical models, the main software used are 3ds Max, Photoshop, V-Ray and so on.Basic modelThere is a general idea before the production, you can use the basic functions of 3ds Max to make a rough shape with a simple BOX, and adjust the shape and proportion on this basis. Be sure to adjust all of them before you start adding details. The order of this step is very important.&x3C;p class=‘img-source’>Basic model after adjusting shape and scaleOnce all the basic model shapes and proportions have been determined, you can add details to the large model on this basis. As for the more detailed places, you can adjust after the completion of the big block. DetailNow that the important parts of the model have been completed, you can add details to these locations. For example, cutting gaps, adding screws and things that are common on mechanical parts.As shown in the image below, most of them use bevels, edge extrusion, chamfering, etc. The tangent at the edge must pay attention to the position of the line to achieve a smooth effect. In this project, some 3ds Max TurboSmooth modifiers were used. TurboSmooth is used to make some smooth surfaces very easy to use, but also to keep the face on the model to a minimum, and can also effectively reduce the final rendering time, if you want the work more realistic and speed up the rendering speed, you can use a render farm, like Fox Render****farm.Making ammunition beltThis section is very simple, you can make a single model, then copy a few and group them into a group, and then use Path Deform Binding to transform. Here you can use the deformer to try to change the Rotation and Twist values to modify more shapes.UVFor UV, UV splitting can be done depending on the color of the model and the different materials. The model is divided into six textures,including body, outer body, internal parts and joints, wires, tubes, small pieces, details, screws and weapons. Lighting and materialsFirst set a scene of HDRI lights, a fill light, a yellow fill light, a blue point light source, and then baked an AO map.MaterialMake a texture in Photoshop:Draw a color layer for the themeYellow details of the robotUse channels to increase rust detailsMake a peel on the robot paintFinally, add some text and logo to the material, and finally use V-Ray to render.
V-Ray For Sketchup To Make A Rendering Imitate The Penda Style
v-ray for sketchup
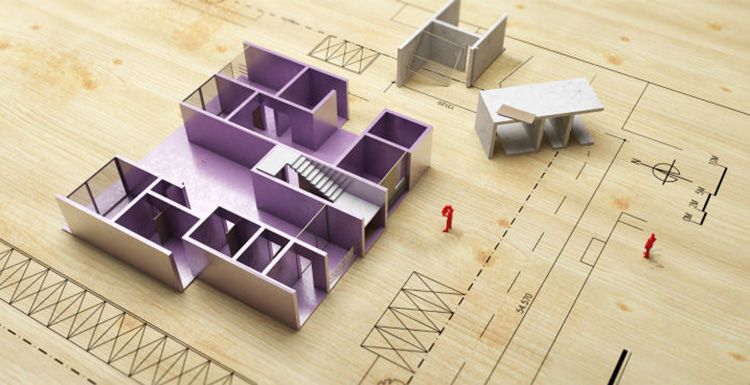
This is a rendering that imitates the Penda style and is the first attempt to simulate a manual model with rendering. The style of Penda has always been very much liked and yearned by me. It is elegant and readable.The following reference picture shows an indoor project from Penda.The software used is SketchUp, V-Ray, Photoshop.Step 1: Create a modelFirstly, look at the material of the reference model, here is composed of four materials, the bottom of the board, the floor plan, the placed character model. There is a rough plan to do before you do it, such as material or floor plan.The original model used in SketchUp is now a work in the previous exercise, and the models on the side are scattered into random placements. Then there is the element in which to add the floor plan.You can make the found design material into a png format in Photoshop, and then use this png into SketchUp to adjust it to the appropriate size. Place it on top of the board as follows,Step 2: Material adjustmentThe choice of material is actually very important. The color of the wood is dark and the color of the metal will affect the final rendering. Then you need to adjust the reflection, roughness, and reflection values of the material.During the adjustment, the board uses very weak reflections and roughness. If it needs to be more realistic, you can add a embossed iron map to increase the detail of the wood grain. The character model used for decoration needs to pay attention to the subdivision and simulate the feeling of smooth plastic. And the focus is on the texture of the metal model, because the Penda's picture has a feeling of powder, so the metal is pink and purple, and Glossiness is connected to the gray map.Step 3: Lighting and renderingThis part chose V-Ray to make lighting, and chose to turn off the skylight, and then played a large light source on the top of the model to simulate the light source, the color is white by default, and the subdivision is increased.Then adjust the AO layer, the picture is as follows:Step 4: Photoshop late adjustmentFirst copy a layer in soft light mode, the texture looks increased, and then adjust the contrast. And adding some dirt will make the model look more realistic. Finally, the periphery is blurred, the focus is simulated, and the final product is finished.Although the final result is still far from the style of Penda, the overall process of rendering is the same.
Willys Jeep Production Analysis, A Real Photo-Level Rendering Tutorial
Maya Render Farm
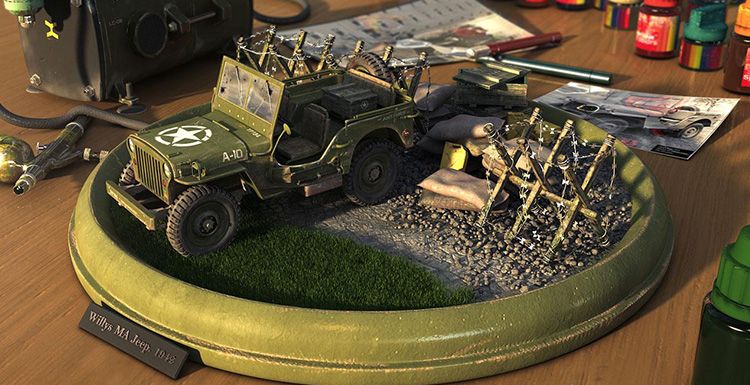
The first step in creation is a material collection, which requires careful observe and study of the structure of the car body. It is only after you understand the image and structure that you can start modeling, which will improve efficiency and prevent excessive modification. The main software used was: 3ds Max, V-Ray 1. Polygon modeling After the conception, the production started. The first thing to start is the creation of the model. The model here is mainly based on the mechanical body, so it can be done with the polygon modeling tool in 3ds Max. Since there are no shortcuts, only basic modeling ability and patience are required. Of course, modeling takes a considerable part of the time. 2. UV deployment: Considering that the vehicle has a certain degree of damage and dirt, it is necessary to specifically paint the damaged paint and dirt at a specific position, which requires UV splitting of some models. The UV split is using 3ds Max's default Unwarp UVW tool. The UV of the car body, tires, ammunition box and fuel tank must be split, and the small parts can be used without UV removal. Only UVW Mapping can be used with appropriate mixed materials (textures). Here only the UV split of some key models is shown, as shown below.However, some models such as: steering wheel, seat, armrest, car suspension system including sandbags, obstacles, stones do not need to be split, but with UVW Mapping with Composite texture or V****RayBlend Mtl material can be used, so for trivial small Objects can save a lot of time to remove UV and improve work efficiency. There are also some models that are used with the V****RayBenldMal material in conjunction with the UVW Mapping tool.3. The drawing of the map: After the model UV is split, the texture map is drawn. The software used here is Mudbox2014. Mudbox is very powerful in drawing textures. The real-time model mapping makes the texture alignment and seam processing very simple and efficient. Very high. The display here takes the car body and the ammunition box as an example. The main tool used in Mudbox is Projection, which maps textures, dirt, and LOGO to a UV-removed model. Since Projection can be projected with photos or processed images in PS, this can greatly increase the authenticity of the creation, so Mudbox's texture drawing is also widely used in next-generation game production and some film production.After the drawing is completed, the texture is baked and output to the PS for further color correction and adjustment. In this example, the textures that I baked include: inherent color map, highlight map, and bump map. The final effect of the car and small scene:Since the ground is going to do some careful division, the ground UV is also removed and imported into Mudbox for texture processing.According to the division of the texture (gravel land and grassland), the model of the ground is treated separately, that is, one side is the grass and the other side stone. The model of the stone is processed in 3ds Max, and the stone on the ground is brushed out by the default model drawing tool of 3ds Max. The grass itself uses a proxy model, and the whole grass is planted using the 3ds Max plug-in Forest.4. Background elements Since the idea is a hand-type of willys jeep, some of the hand-made tools are used as background elements. The main tools are airbrushes, air pumps, model knives and paint bottles, and these objects are very industrial. It can also respond to the car body, so use it as a background element. The paint bottles can be used in a variety of colors to increase the color of the background image, and the colorful colors used in the background will not be overwhelming. The photo only reflects the history of Willys Jeep, and also adds elements of the background image. 5. Lighting and rendering In order to have a strong sense of sunshine, V****RaySun is used here because VRSun is better and simpler to show true sunlight. Putting it on the front of the model has a meaning of "bright guidance". The warm and bright light on the grass can also form a contrast with the obstacles on the gravel floor under the shadow of the back, the ammunition box and the sandbag. The specific light position layout is as follows: The main parameters of V****Ray specific parts are as follows:6. Post-production adjustment Post-production used are DF and PS. The output Z channel can be used as a depth of field and fog effect. The specific effects are as follows:Depth of field effect selection is synthesized in PS. Of course, it can be added in AE or DF according to personal preferences and habits. In PS, you can adjust the depth of field effect by adding "Z channel" to Alpha in the channel layer and then using "Filter Blur Lens Blur". Basic color correction and fog and glow are added in DF. Summary: Even if the production of jeep is completed, the production process and ideas are expected to be helpful to everyone, thank you! Author: Rui City
Teach You The Use Of Hdr Maps In VR
V-Ray Render Farm
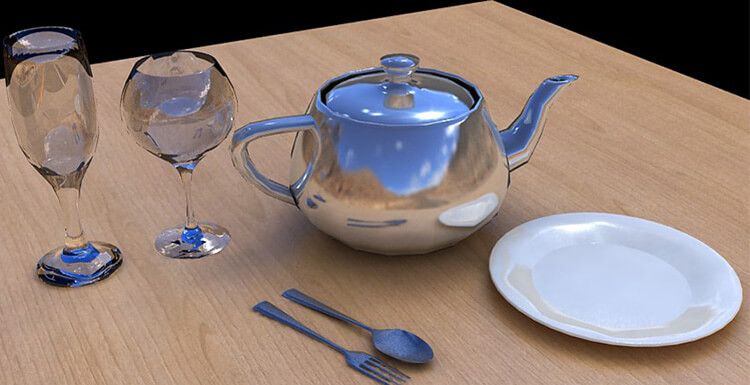
HDR is a high dynamic range texture, the full name is High Dynamic Range, in short, is the light beyond the ordinary light color and intensity. With the help of HDR, we can use color values beyond the normal range, so we can render more realistic 3D scenes. Generally, computers use 8bit (256) or 16bit (65536) levels to distinguish images when representing images. The brightness of the image, but this area hundreds or tens of thousands can not reproduce the real natural lighting conditions, beyond this range you need to use HDR map.Below are two contrasting renderings The first picture is the picture with the HDR map added, skylight (HDR map) + reflection (HDR map) + refraction (HDR map) + VR surface light (off the effect of highlights, affecting reflection); the second picture is skylight The effect of the 1.0+VR surface light (which affects the high light and affects the reflection). HDR textures are better suited for use in open environments. When you want to represent a single object, or a group of objects, HDR maps perform well in scene illumination and refraction. However, indoor scenes and outdoor scenes are not suitable. The role of HDR maps is mainly used to achieve scene illumination and analog reflection refraction, so that objects behave more realistically. Let's take a look at how to use HDR maps: I created a simple scene with two glass cups, a metal teapot, a ceramic dish, and a metal spoon fork. Settings in the render panel: default lighting: off, skylight: off There is no light source in the scene, and the rendering is black. We started to make the scene light up, turn the sky on, and render the image. See, at this time the object of the scene does not show texture, below we open the reflection channel, click once, find VRHDR, and open the refraction channel, drag the VRHDR of the reflection channel to the refraction channel, and associate the copy. Drag the HDR of the reflection channel onto the shader and copy it. Edit the parameters of the HDR map on the shader In this case, I adjusted two places. Everyone looked at what kind of effect they wanted and tried more. The rotation angle of the texture and the multiplier affect the rendering. The picture at this time You can also add HDR textures to the skylight channel to achieve the effect of lighting the scene, but usually the hdr color will affect the object itself (like the image below), so this requires us to adjust by changing the color of hdr.Click in the light channel, find the RGB Tint, associate it to the shader, and then associate the hdr map to the RGBTint. These three colors make the color of the texture black and white. Render the picture, you will see that this picture is brighter than the previous HDR when there is no HDR, the contrast is high, the color is positive. Finally, we put a light on the side to make the picture layer richer.
Recommended reading
Top 9 Best And Free Blender Render Farms of 2025
2024-12-30
Revealing the Techniques Behind the Production of Jibaro "Love, Death & Robots", Which Took Two Years to Draw the Storyboard
2025-02-10
Top 10 Free And Best Cloud Rendering Services in 2025
2025-03-03
Top 8 After Effects Render Farm Recommended of 2025
2025-02-10
Top 5 Best and Free 3d Rendering Software 2025
2025-02-10
Shocked! The Secret Behind Using 3D to Make 2D Animation was Revealed!
2025-02-10
How to Render High-quality Images in Blender
2024-12-04
Easy Cel Shading Tutorial for Cartoon in Blender Within 2 Minutes
2025-02-10
Partners


