How to Make a Core-shell Structure in Cinema 4D

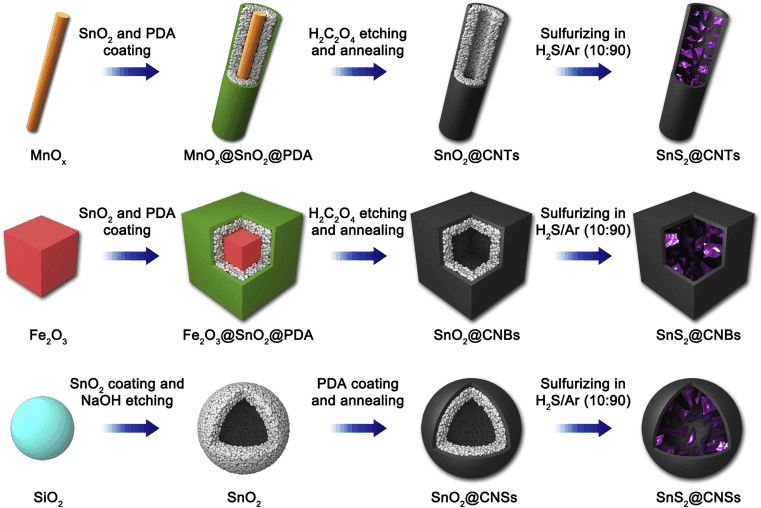
In scientific research drawings, three-dimensional model diagrams can show more information than two-dimensional plane pictures, especially when designing and preparing nanostructures, three-dimensional model diagrams can intuitively show the design ideas and synthesis paths of materials. For example, in this paper (Ref. Joule 2018; 2: 725-735.), published in Joule magazine, a high-level, high-value, and incisive paper that showcases nano aesthetics, a three-dimensional model is used to intuitively express the synthesis path of the material. Harmonious color scheme and rich details: One of the ingenious features of this group of three-dimensional model diagrams is that irregularly stacked small balls are used to represent the SnO2 layer, which means that SnO2 is stacked by granular nanocrystals.
In this article, Fox Renderfarm, the best could rendering services provider and C4D render farm, will share with you a Cinema 4D tutorial about how to make a core-shell structure. This tutorial is written by 3d Artist Yuan Liu. Now let’s introduce a modeling method for stacking model of small balls of any shape in C4D software.
The specific modeling path is: modeling the shape of the target polygon→clone ball to fill the target polygon→dynamic collision to make it regular arrangement. (If you need the effect of partial fusion between the small balls, add a step of volume generation)
The specific completion effect is shown in the figure below

Open C4D, here is the R20 version as an example
- First, perform polygonal modeling to make the geometric shape of the target shape.
Here is an example of a notched spherical shell
1.1 First create a sphere in the geometry menu bar (default Radius 100), select the sphere, click to convert to editable polygon (or keyboard C key).

1.2 Select the frame selection mode in the selection tool, select the surface mode on the left, and select only visible elements on the hook in the frame selection setting.

1.3 Press F3 to enter the right view, select a quarter of the sphere, and delete with the DELETE key

1.4 Press F1 to return to the three views and create a Cloth Surface

1.5 Drag the sphere with part of the surface deleted into the Cloth Surface, and set the Thickness of the Cloth Surface to 20cm.

1.6 Middle mouse click on Cloth Surface, you can select Cloth Surface and sphere at the same time, right click and select "Connect Object+Delete", turn the second dot behind to red, cancel the polygon rendering, and check X-ray in the basic properties .


- Then use the clone tool to collide with the rigid body to realize the uniform filling of the small ball in the target shape.
2.1 Create a new sphere with a radius of 3.5 and a segment of 12 types of icosahedrons (can be adjusted by yourself, the more segments, the easier it is to freeze); create a clone generator in the generator column, and drag the new sphere into a subset of the clone .

2.2 Set Cloner mode as the object, drag the cloth surface into Cloner's object frame, change the distribution method to volume, and set the number to 5000~10000 (depending on the size of the model).

2.3 Select Cloner and create a rigid body label (label→simulation label→rigid body); label collision setting: apply label to the child, select the top layer for independent elements; in the force attribute, set the follow displacement to 6 (can be adjusted by yourself).


Ctrl+D to enter the project settings, in the general dynamics settings, change Gravity to 0.
2.6 Click the play button to play the ball movement animation. After playing to 10 frames, the ball basically moves to a position corresponding to the shape of the grid.

2.7 Create a new sphere as a shadow effect. Keep the sphere position and properties as default; double-click the blank position in the material area to create a new material. Here, create two new materials and drag the materials to the corresponding objects (sphere and clone).
Double-click the material ball to open the material editor. The material settings are as shown in the figure: For the shadow material, only the transparent channel is checked, and the channel color can adjust the shadow depth; for the ball material, check the color and reflection channel, and add a diffuse layer to the reflection layer, diffuse Add a Fresnel texture to the layer color. Adjust the color and position of the color mark in the Fresnel texture settings to change the color of the ball.


2.8 Long-press the left mouse button on the ground option, select the sky in the pop-up menu to add a sky background to the environment, search for HDRI in the content browser on the right, you can find the HDRI shader preset by the software, here you can choose a suitable one, double-click to add it to Material window, and drag the HDRI shader to the sky just created.

2.9 Select the sky and select the rotation tool to rotate the angle of the sky to find a suitable light angle; after adjusting the angle, add a composite label to the sky, and uncheck the camera visibility in the label settings, so that you can only render during rendering Lighting does not render the sky.

2.10 The following is the rendering settings, as shown in the figure, click to open the rendering settings window, check the Alpha channel in the save column, and set the format to PNG, so that a picture with a transparent background can be rendered; after finding the angle, click to render to the picture Viewer, wait for the rendering to complete and click Save. (To save the transparent background picture PNG+Alpha)

- The following is the partial fusion between spheres through volume generation.
3.1 Change the sphere type of the cloned subset to tetrahedron, and set the number of segments to 3 (minimum value); create volume generation and volume grids in the generator column, drag the cloned object into the volume generated subset, volume Generated as a subset of the volume grid.

3.2 In the volume generation settings, click Clone to check Use grid points, change the mesh radius to 3 cm, and the voxel size to 1 cm; drag the material of the cloned object to the volume mesh; change the radius of the shadow sphere to 90~95 cm to prevent overlapping of the shadow sphere and the stacked sphere. Finally, render it to the image viewer and save it.

- If you want to add a layer of spherical shell to the outside, you only need to create a cut spherical shell according to the method in the first step, adjust it to a suitable size, add a subdivision surface, and give it a material. The color of the material can be adjusted by yourself.

This kind of ball clone filling and rigid body collision method is used to make the stacking effect of the balls. It is suitable for any closed polygon model, but it is necessary to coordinate the relationship between the number and size of the balls and the size of the target polygon. The number of balls is too small. Too much is easy to cause lag. In addition, you can reduce the number of subdivisions of the ball as much as possible without affecting the rendering effect, so as to improve the calculation speed.
Recommended reading
Top 9 Best And Free Blender Render Farms of 2025
2024-12-30
What is Jibaro? Reveal the Story and Techniques Behind the Production of Jibaro "Love, Death & Robots"
2025-11-03
Top 10 Free And Best Cloud Rendering Services in 2026
2025-12-26
9 Best & Free 3D Rendering Software for Architects & Designers
2025-12-08
Top 8 After Effects Render Farm Recommended of 2025
2025-02-10
Easy Cel Shading Tutorial for Cartoon in Blender Within 2 Minutes
2025-11-26
Shocked! The Secret Behind Using 3D to Make 2D Animation was Revealed!
2026-01-06
How to Render High-quality Images in Blender
2024-12-04
Partners
Previous: 3ds Max Tutorial: How to Make a 3D Cute Doll (1)
Next: 3ds Max Tutorial: How to Make a Cyberpunk Environment
Interested


