Corona for 3ds Max Tutorial: Modern Minimalist Style Loft Production Analysis

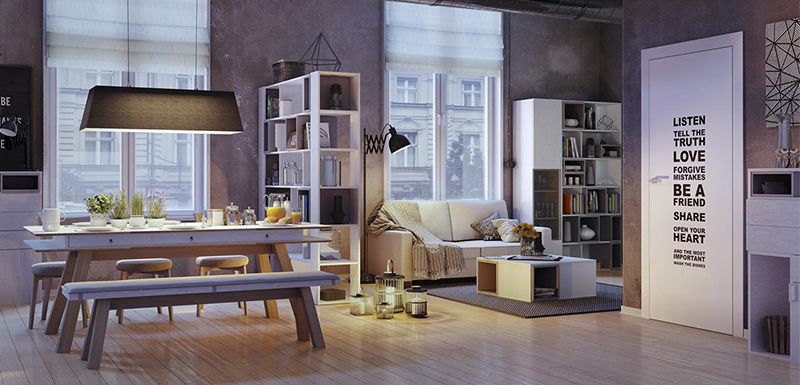
Fox Renderfarm, a powerful but affordable render farm, organizes and shares an analysis of the production of modern minimalist Loft using Corona for 3ds Max. This Loft has some living room furniture, doors, floors, sofas, and some accessories. The atmosphere needs to be warm and comfortable. The picture composition is 16: 9.

After we had preliminary requirements, we began to discuss the concept design and decided to make a small apartment of modern Loft style. With many details, the material performance should be soft and comfortable. Compared with the sunny daytime scene, we tend to have rich color changes. The sunset scene is more suitable for expressing an interesting living space.
Reference
Before making each project, you must choose a reference, which will be used as a reference for the future atmosphere, color, details and design inspiration. At this stage, we have the basic model and reference drawings. It is time to start the next step.

The furniture is mainly divided into two areas: tables in the dining room, sofas in the living room, coffee tables, and large windows that are indispensable in Loft. Of course, the floor is also very important.
Design and modeling
There will be many items in this scene that need to be modeled by 3ds Max, so the first step is to make basic models of some key items first. After confirming the model and space layout, start to enter the lighting, add details and texture map. Below are some pictures of angles. After the shape is confirmed, you can start adding details.


Room modeling
For automatic mapping, the coordinates and different material channel IDs can be used as composite materials. The wooden grid ceiling and the floor are made by the Floor Generator plug-in. The plug-in can control the size of the model very well. Then use polygons to make shelves and windows.

The windows are made with polygons and many details are added, and the wall is made with brick walls and replacements. The advantage is that each face can accurately show the details. It should be noted that the subdivision of the number of faces of each model must be enough to obtain the best results.

You only need to find the reference picture in advance, and then make it according to a list. There are a lot of things, but it is relatively simple.

The lantern is modeled as a polygon, and a spiral coil on the edge was added using Twist and Bend.

The decorative vases in groups of three are also polygonal and Turbosmooth, and apply displacement and procedural noise maps.

The sofa also continues to add details from a Box. The pillow and fabric are also made by Marvelous Designer. This software is simple and beautiful to make this material! When importing back to 3ds Max, an optimized editor was used to reduce the face. Other things are basically the same way. After finishing the model, split the UV, so that you can directly enter the production of the texture. In order to ensure the clarity of the ground texture, 25,000 pixels are used.

Texture
After doing some tests, I decided to choose the Corona renderer. Corona renderer is a powerful renderer, and it has concise parameters and lighting effects, and only requires simple steps to have a perfect effect.
Blanket
This material is very simple, it is a Falloff in the texture channel, mixed two same textures, and used Color Correct to make the two images one brighter and one darker. Color Correct has many options for editing textures. In the Displacement channel is a mixed texture with a texture and a black and white texture.

Ground
We have a physical sample of the floor and scanned to make a texture of up to 25,000 pixels, and then use CoronaRaySwitchMtl to avoid the scene from being affected by the ground with high color saturation and high texture. The texture map is loaded with the MultiTexture plugin Can cooperate with the floor generation plug-in to make a more natural and random effect.

Shading cloth
The key to this material is reasonable transparency. You need to make sure that the Thin option in the Refraction rollout is checked.

The other materials are basically the same, all made with high-quality textures.
Lighting
After the material is ready, you can start testing the light. I chose some reference images of dusk as the background to diffuse beautiful light and shadow.

We set this twilight picture in Corona Lights, placed it as the main light source in the window, and placed some small but high-intensity area light to cast a clearer shadow. The next step is to make a simple background for testing and put it outside the window to enhance the realism.

Post-production
Before saving the rendering results, use Virtual Frame Buffer to make some color adjustments. It is necessary to pay attention to the contrast between exposure and shadow. Save the format as a 16-bit PNG file.


Post-production is adjusted using After Effects CS6, and the final effect is as follows,


Recommended reading
Top 9 Best And Free Blender Render Farms of 2025
2024-12-30
Revealing the Techniques Behind the Production of Jibaro "Love, Death & Robots", Which Took Two Years to Draw the Storyboard
2025-02-10
Top 10 Free And Best Cloud Rendering Services in 2025
2025-03-03
Top 8 After Effects Render Farm Recommended of 2025
2025-02-10
Top 5 Best and Free 3d Rendering Software 2025
2025-02-10
Shocked! The Secret Behind Using 3D to Make 2D Animation was Revealed!
2025-02-10
How to Render High-quality Images in Blender
2024-12-04
Easy Cel Shading Tutorial for Cartoon in Blender Within 2 Minutes
2025-02-10
Partners
Previous: Behind the Scenes: Avatar of A Man
Next: Fox's Got Talent March Winner Revealed
Interested


