A Tutorial Of Night Illuminator Scene Production By Octane For C4D

The fast cloud rendering services provider and GPU&CPU render farm, Fox Renderfarm, will share with you a C4D tutorial.
Octane for C4D is really powerful, especially in addition to the easy-to-use and high-quality rendering of the Octane renderer. Another important reason is speed. Today we use an existing C4D model file to share how to use Octane to make these beautiful night illuminator scene.
Preliminary Idea
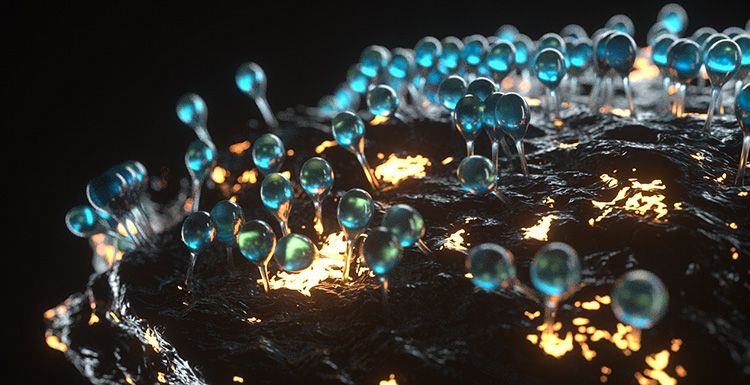
The first thing to do is to figure out the approximate effect to be presented and the position of the light source. I want to do something that glows on the stone in the night, and the objects are as transparent as glass. So there will be some illuminants and some auxiliary light sources. With these ideas, you can light it up.

Lighting Adjustment
What I want is the effect of the night, so first open the sky color and adjust it to black. The black sky will make us see more clearly. Then add a light, and in the rendered window we can see the effect of the real-time lighting.

Rotate to adjust the light to achieve a desired effect. Then change the light to an effect that is not visible when rendering. Check camera visility in the Visbility of the light. Reduce Power to 5 and change the color to blue.

Now that the main light source is available, start adjusting the auxiliary light source. The auxiliary light source does not need to be too strong, reducing its Power to 5 and changing the color to bluish. Two lights will give the scene model a corresponding feel. When adjusting, remember that the highlights of the objects on the stone should also be noticed. Throughout the process we have to constantly adjust the light to find the best results.

After the rendering test, the highlights are still a bit bright, then we need to adjust the power of the lights again. After the test, the main light was not bright enough, and it lacked some contrast with the auxiliary light. I raised the main light source again. It now looks like contrast.

Now I find that the lower right corner is darker, so I need to add another light to it. Lower Power to 5, change the color to bluish, render, and continue to adjust the light level.

Material
First of all, the main body of this model is stone, and then there is some bright light on the stone. So first give the stone a black material, but don't be too dark. Don't make the reflection of the stone too strong, raise a little Float, and add a displacement map to the stone to make the bump. This effect can also be achieved by adding noise. Noise can look for a stone-like one, then change Amout to 3. For better results, you can also add noise Into Diffuse. Now we can see that the stones are already bumpy. In the process, we can adjust other values to make the noise produce some different changes.

You can break the link to the texture before proceeding to the next step. Re-create a new diffuse material to make the light, remember to remove the DIFFUSE of the shader, just keep the light. Next, add an RPG to the shader. I hope the stone will emit a yellow spot, so change the shader to yellow. Now we can mix the two shaders. So create a shader and blend the noise with the two shaders. Adjust the size of the noise to control the yellow display to see the effect of the integrated rendering.

Now that the stone's departmental effect is ready, we can hide it to adjust the part above the stone. Create a new glass ball, then give it blue and adjust the 3S to the shader. The part of the value needs to be fine-tuned. Modify the display of the Density control color and increase the specular depth of the glass to reduce the black portion. But the color is not enough, you need to add another color and change the Density to 100. But I need the position of the stone below the model to be more like glass, so I have to rebuild a glass material and blend it with the previous material and add a gradient. Look, the effect is now closer to my expectations.

All models use clones, so we only need to modify the UV of a model. We need the model above is 3S below the glass, so we need to give the UV a gradient, adjust the gradient to achieve the effect we need.

Finally Adjustment
Adjust the final effect in the Octane Settings. Bloom power and Glare power directly affect the final result. But I found that the yellow part of the stone was a little less, so I changed its Power to 500. Well, it is now closer to the ideal state.

To achieve the desired result is not a quick process and needs to be adjusted step by step. Keep trying other methods, maybe there will be good results. And, what matters is not the result, it is the process of learning.
Fox Renderfarm hopes it will be of some help to you. It is well known that Fox Renderfarm is an excellent cloud rendering services provider in the CG world, so if you need to find a render farm, why not try Fox Renderfarm, which is offering a free $25 trial for new users? Thanks for reading!
Recommended reading
Top 9 Best And Free Blender Render Farms of 2025
2024-12-30
Revealing the Techniques Behind the Production of Jibaro "Love, Death & Robots", Which Took Two Years to Draw the Storyboard
2025-02-10
Top 10 Free And Best Cloud Rendering Services in 2025
2025-03-03
Top 8 After Effects Render Farm Recommended of 2025
2025-02-10
Top 5 Best and Free 3d Rendering Software 2025
2025-02-10
Shocked! The Secret Behind Using 3D to Make 2D Animation was Revealed!
2025-02-10
How to Render High-quality Images in Blender
2024-12-04
Easy Cel Shading Tutorial for Cartoon in Blender Within 2 Minutes
2025-02-10
Partners
Previous: The Essential Thinking Of Roughness And Anisotropy (1)
Next: Clarisse Tutorial: Asset Path Management
Interested


