3ds Max Tutorials: Semi-realistic 3D Game Scene Interior Production Sharing (1)

Fox Renderfarm, as the best 3ds Max render farm and cloud rendering services provider in the CG industry, the tutorial we shared for you this time is from the 3D artist Thepoly, on how to use 3ds Max and Maya and other software to make a semi-realistic 3D game scene interior production process.
This project uses the standard PBR process, using 3ds Max to complete the basic model building, and determine the object scale. Complete high poly carving in ZBrush, topology in Maya, baking in Marmoset Toolbag 3, Substance Painter to complete the production of PBR materials, and finally use Marmoset Toolbag 3 for rendering.

Production process
The production is divided into three parts:
- Modeling
- Material production
- Rendering
Modeling
Before production, determine what materials, what objects are in the scene, and the overall ratio, and then determine the production order according to the ratio. Most of the scenes are walls and stones and wooden furniture, so they are the key part of the production.
Quickly build up their approximate proportions in 3ds Max.

Complete the medium polygon model
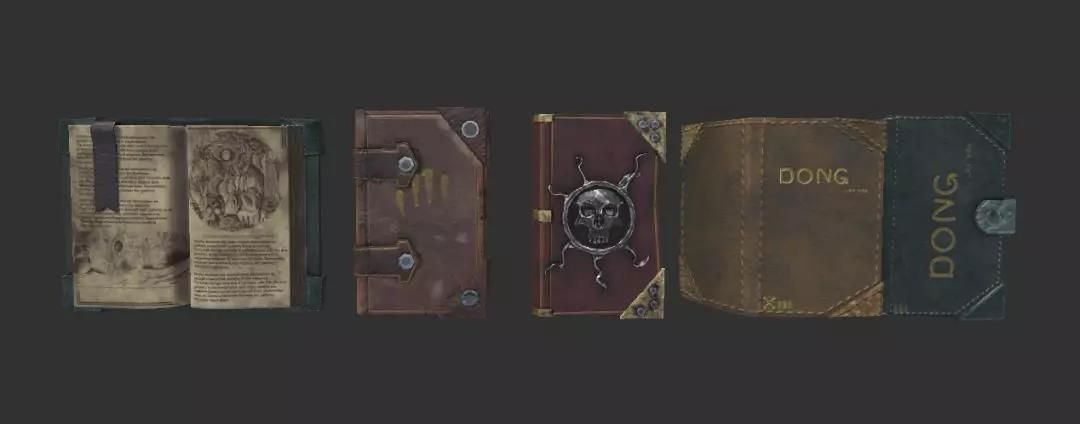
After establishing the proportion of large objects, continue to build down the remaining objects in the scene. And further, enrich the details of the model. There are a lot of repetitive objects, just make a few different shapes. This does not seem to be too repetitive.

Taking the above book as an example, many different types have been produced, which can reduce visual duplication.
There are two fabrics in the scene, here is a pillow as an example,

This product uses the cloth calculation that comes with 3ds Max. The specific process is as follows,

Create blocking objects,

Create a pillow basic model (the higher the number of segments, the better the simulation effect, but it also stuck).

Squash and find the fabric in the modifier,
Analog computing

Finally, get a simple pillow model. (The folds of the fabric should be sorted out, the above is a simple demonstration. The curtains are the same, MD may have better results)

Next, import the model into ZBrush for sculpting.
Carving High Poly
Take the wall and stone of the house as an example:

After importing the medium-surface model into ZBrush, it is because of the irregular shape of the stone. You can use Dynamesh in geometry editing to edit the model.

The No.1, No. 2, and No.3 brushes are used for large-scale carving of stones. The No. 4 brush adjusts the shape to prevent insertion. Finally, the No.5 and No.6 brushes flatten some edges and corners to make the structure hard. Thus reflecting the texture of the stone.
The big idea of the wall is the same. Finally, use the noise in the surface, adjust the curve and noise ratio, etc. to simulate the graininess of the wall and the stone surface.

Finally, add some details such as cracks and bumps to enrich the picture. Use the No. 6 brush mentioned above and press it again to achieve better results. (This part of the production reference is very important)
Now follow the best cloud rendering services provider and 3ds Max render farm, Fox Renderfarm, to the next part: 3ds Max Tutorials: 3ds Max Tutorials: Semi-realistic 3D Game Scene Interior Production Sharing (2).
Recommended reading
Top 9 Best And Free Blender Render Farms of 2025
2024-12-30
Revealing the Techniques Behind the Production of Jibaro "Love, Death & Robots", Which Took Two Years to Draw the Storyboard
2025-02-10
Top 10 Free And Best Cloud Rendering Services in 2025
2025-03-03
Top 8 After Effects Render Farm Recommended of 2025
2025-02-10
Top 5 Best and Free 3d Rendering Software 2025
2025-02-10
Shocked! The Secret Behind Using 3D to Make 2D Animation was Revealed!
2025-02-10
How to Render High-quality Images in Blender
2024-12-04
Easy Cel Shading Tutorial for Cartoon in Blender Within 2 Minutes
2025-02-10
Partners
Previous: Blender, Keyshot And Modo Will All Support RTX-based Rendering
Next: Creating A Game Character “Yae Sakurain” In ZBrush And Maya
Interested


